

Change Brush Size Photoshop Shortcut
Here are twenty of my favorite shortcuts for the Brush and painting tools in Photoshop. Although I often use the Brush tool as the example, many of these shortcuts also work for other painting tools such as the Pencil, Mixer Brush, Clone/Pattern Stamp, Eraser, Gradient, Paint Bucket and more.
1) Resizing using the Bracket Keys
- Tap the left/right bracket decrease/increase brush size.
- Hold the left/right bracket to continuously decrease/increase brush size.
- To customize the keys used to increase/decrease brush size and hardness (as many international keyboards do not have brackets), under Edit > Keyboard Shortcuts – choose "Shortcuts For: Tools". Scroll down (almost the bottom of the list) and enter any single character to set a new shortcut for Decreasing/Increasing Brush Size.
2) Resizing Using the HUD (Heads-Up Display)
- On Mac: Control + Option (Mac) –drag left/right in order to decrease/increase brush size and up/down to decrease/ increase brush hardness.
- On Windows: Control + Alt + Right click -drag left/right to decrease/ increase brush size and up/down decrease/ increase brush hardness.
- To use the change Brush Opacity (instead of the Brush Hardness), based on the vertical drag movement, select Preferences > Tools and uncheck "Vary Round Brush Hardness based on HUD vertical movement".
3) Custom Cursors
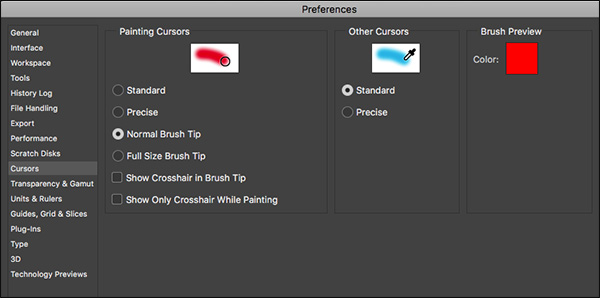
- To customize the display of the painting cursors, select Preferences > Cursors and select from the following:
- Standard – to display the small iconic cursors
- Precise – to display cross hairs
- Normal Brush Tip – the circle icon size represents pixels to be painted with greater than 50% effect
- Full Size Brush Tip – the circle icon size represents all pixels to be painted
- Check "Show Cross hairs in Brush Tip" – to easily see the center of the brush
- Check Show Only Crosshair While Painting – to display the cross hairs only while painting
- To temporarily access Precise Cursors, enable the "caps lock" key.
- Choose to set additional tools icons (such as the Eyedropper tool) to Standard or Precise.
- To change the Brush cursor preview color, click in the red swatch under Brush Preview and choose a new color.
4) Opacity and Flow
- Opacity controls the opaque/transparent quality of the paint (are you using an opaque metallic paint or a transparent varnish?). Flow controls the speed at which paint is laid down (are you pressing the nozzle of the can of spray paint just a little, or all the way down?).
![]()
- To change the Opacity, tap a numeric key to add the percentage of the tapped number. (1 = 10%, 2= 20% etc. and 0 = 100%). Tapping two numbers quickly will give you that exact amount (5 + 4 = 54%). Note: If you have a tool selected that doesn't have an opacity setting in the Option bar, these shortcuts will affect the Opacity option on the Layers panel.
- Shift + tapping a numeric key changes the Flow value.
- If the selected brush has the Airbrush attribute enabled, tapping the numeric keys will change the Flow by default and adding the Shift key will change Opacity.
5) The Airbrush Attribute
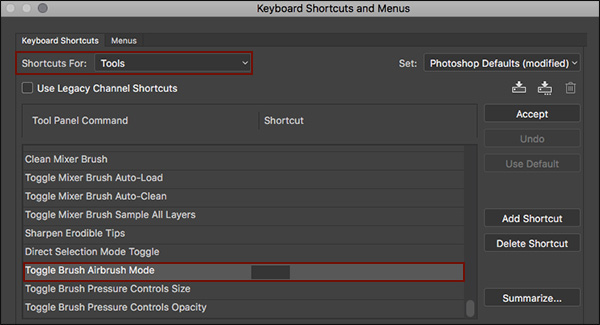
- Option + Shift + P (Mac) | Alt + Shift + P (Win) toggles the Airbrush attribute on/off.
![]()
- To customize this shortcut, select Edit > Keyboard Shortcuts and choose "Shortcuts For: Tools". Scroll down (almost the bottom of the list) and enter a single letter to set a new shortcut to Toggle Brush Airbrush Mode.
5) Changing Blend Mode
- To quickly cycle through a painting tool's blend modes, hold the Shift key and tap the "+" (plus) or "-" (minus) to move forward or backwards through the list. Note: If you have a tool selected that does not have Blend Mode options in the Options bar, these shortcuts will affect the blend mode options on the Layers panel.
- In addition, each blend mode has a unique keyboard shortcut. They all begin with Option + Shift (Mac) | Alt + Shift (Win) then a single letter.
……….Normal + N, Dissolve + I, Behind + Q, Clear + R
……….Darken + K, Multiply + M, Color Burn + B, Linear Burn + A,
……….Lighten + G, Screen + S, Color Dodge + D, Linear Dodge + W,
……….Overlay + O, Soft Light + F, Hard Light + H, Vivid Light + V, Linear Light + J, Pin Light + Z, Hard Mix + L
……….Difference + E, Exclusion + X
……….Hue+ U, Saturation+ T, Color + C, Luminosity + Y
……….I don't know of shortcuts for Darker Color, Lighter Color, Subtract, or Divide.
6) The Brush Preset Picker
- With a painting tool selected, Control -click (Mac) | Right -click (Win) anywhere in the image area to access the Brushes Preset Picker.
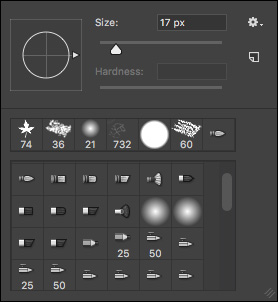
- Tap '<' or '>' to move to the "previous" or "next" brush in the list in the Brush Presets Panel. Shift + '<' or '>' moves to the first/last brush in the list. To customize this shortcut, select Edit > Keyboard Shortcuts and choose "Shortcuts For: Tools". Scroll down (almost the bottom of the list) and enter any single character to set a new shortcut to move through the brush presets.
7) Locking Brush Attributes
- The two most common pressure sensitive brush attributes (Opacity and Size) can be locked on/off using the icons in the Options Bar. When enabled, the pressure sensitive pen/tablet control the opacity/size. When off, the opacity/size is controlled by the brush preset. To assign a custom keyboard shortcut to turn these options on/off, select Edit > Keyboard Shortcuts and choose "Shortcuts For: Tools". Scroll down (almost the bottom of the list) and enter any single character to set a new shortcut for either Toggle Brush Pressure Controls Size or Toggle Brush Pressure Controls Opacity.
![]()
- To lock additional brush attributes (allowing you to move freely between brush presets while retaining specific attributes), click to the right of the attribute grouping (Shape Dynamics, Scattering etc.), on the Brush panel.
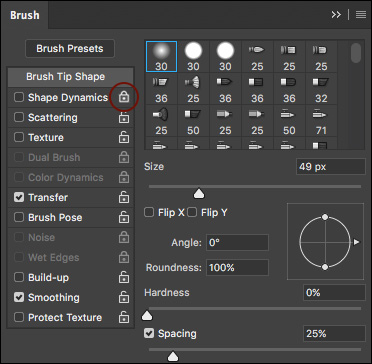
- If you have a brush configured, and simply want to change the tip of the brush (while leaving all of the other brush attributes as they are), on the Brush panel, click Brush Tip Shape and select another shape.
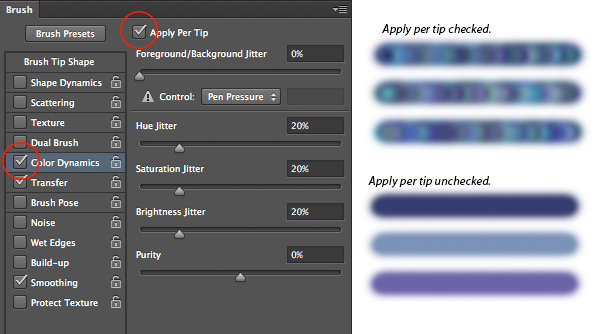
8) Color Dynamics
When using Brushes, color can be applied on a per stroke or a per tip basis. In the example below the first three strokes have the Apply Per Tip checked. Because the Hue, Saturation and Brightness settings all have 20% Jitter values, each stoke varies in color. The second three strokes have the Apply Per Tip unchecked resulting in each paint stoke having a solid stroke, the color only changing as each new stroke is painted (not within a single stroke).
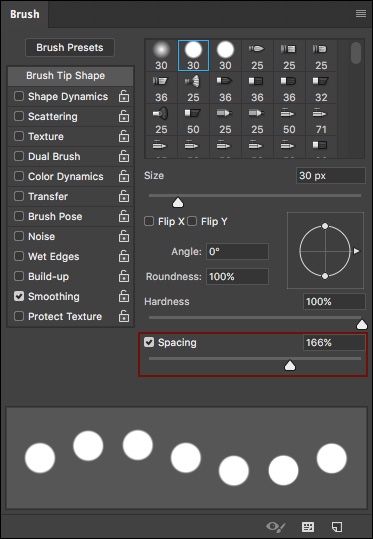
9) Painting Dotted Lines
In order to create a "dotted" line instead of a solid paint stroke, display the brushes panel and click on Brush Tip Shape. Drag the Spacing slider to the right until the desired amount of space falls between each mark. Try changing the roundness and angle for variation. Note: for more structured dotted and dashed lines, try using the Shape or Pen tools with a stroke applied.
10) Painting Straight Lines
To paint a straight line, hold the Shift key while dragging a stroke. Or, click once with a painting tool, then release the mouse, hold the Shift key and click again to draw a straight line between the two points.
11) Sampling Color While Painting
Holding the Option (Mac) | Alt (Win) samples a color with the eyedropper while using the painting tools.
12) Creating Fluid, Precise Paint Strokes that Simulate Pressure Sensitivity
- To create fluid, precise stroke of paint, first create a path using the pen tool. Then, make sure that the painting tool that you want to use is set up with the correct options (such as brush size and opacity etc.). Finally, from the Paths panel fly-out, menu, select Stroke path and select the desired tool. This technique works with several painting tools and can be extremely helpful for example, when using the Dodge tool to add a highlight along the edge of an object.
- To simulate pressure sensitivity when stroking a path, select the path in the paths panel, choose Stroke Path from the fly-out menu, and check Simulate Pressure. Note, it is important to set up your brush (or whatever tool you want to use), as well as it's attributes BEFORE you stroke the path.
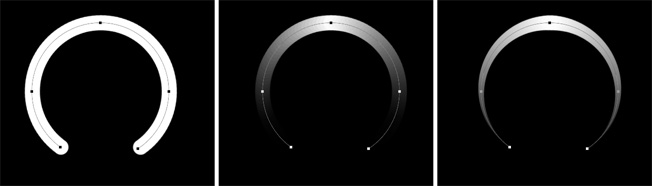
In this illustration, the first path was stroked with a brush with the Simulate Pressure option unchecked. The second and third paths both had the Simulate Pressure option checked; the middle illustration demonstrating the brushes Opacity (under Transfer on the Brush Panel) set to Pen Pressure, the right illustration demonstrating Opacity and Size (under Shape Dynamics on the Brush Panel) set to Pen Pressure.
13) Creating and Saving a Custom Brush
- To define a Custom brush, use one of Photoshop's selection tools to select the desired area. Then, choose Edit > Define Brush Preset and give it a name. Note: brush presets are gray-scale and use the selected foreground color to paint.
- The custom brush appears in the Brush Presets panel and can be easily modified (if desired) using the Brush panel (select the brush tip and then modifying any additional attributes).
- Click the New Brush Preset icon on the Preset panel to save the custom brush with it's attributes. To save the Brush preset and options set in the Options bar (blend mode, opacity etc.), as well as the foreground color, click the New Tool Preset icon on the Tool Preset panel.

After defining a custom brush, I changed the Shape Dynamics and Scattering options in the Brush panel and saved the (now modified) brush using the Brush Preset panel. Then, to save the Brush and include it's custom options (the blend mode set to Multiply, the Opacity 50%, and white as the foreground color), I saved it as a Tool Preset.
14) Viewing the Active Brush
Photoshop CC's has the ability to display the seven most recently used Brushes as well as indicate if the currently used preset has been modified. This video shows you how.
15) The Mixer Brush
- There are five really useful customizable keyboard shortcuts specifically designed for the Mixer Brush. Choose Edit > Keyboard Shortcuts, and using the Shortcuts for "Tools" scroll the to the bottom and enter custom keyboard shortcut to enable the option(s):
- Load Mixer Brush
- Clean Mixer Brush
- Toggle Mixer Brush Auto-Load
- Toggle Mixer Brush Auto-Clean
- Toggle Mixer Brush Sample All Layers
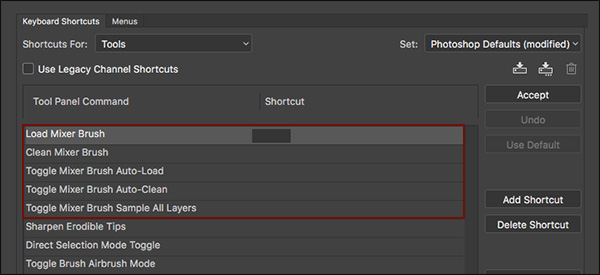
……….Note: there is also an option to assign a keyboard shortcut to Sharpen Erodible tips.
- Changing Mixer Brush options using the keyboard
- When using the Mixer Brush tapping a numeric keys change the "Wet" value.
- Shift + tapping a numeric key changes the "Flow" value.
- Option + Shift (Mac) | Alt + Shift (Win) + number changes the "Mix" values.
- Typing 00 (zero, zero) in quick succession quickly sets the "Wet" and "Mix" values for the Mixer Brush to zero – resulting in a dry brush.
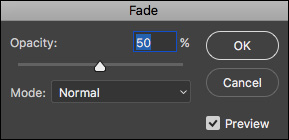
16) Fading Paint Strokes
Immediately after painting a stroke, select Edit > Fade Brush Tool to change the opacity and/or change the blend mode of the paint stroke. Note: This shortcut also works for a variety of additional commands including image adjustments, strokes, fills and filters.
17) The Eraser Tool
- The Eraser tool has a special "Block" mode which gives you a eraser in the shape of a square. What's unique is that when you zoom in and out on the image and use the tool, it erases a certain portion of the screen – regardless of the zoom level.
![]()
- Holding the Option (Mac) | Alt (Win) with the Eraser tool will erase with history. Note: when Photoshop opens a document, it takes (by default) a snapshot of the document that appears at the top of the History panel – this is the "history" that the Eraser paints with. To change the "History" state (that the Eraser uses to paint from), click in any empty well to the left of the desired state in the History panel. Both states (the one chosen to "erase" with and the one that's being "erased" upon) must have corresponding layers and be in the same color mode.
18) The Paint Bucket Tool
- The Paint Bucket can fill with the Foreground color or a Pattern. With the Paint Bucket selected, choose which fill content option you prefer in the Options bar. Note: the Fill command (Edit > Fill) also has the pattern option, but the Paint Bucket may be faster than using a dialog box.
- To fill a transparent area of an image with the foreground color, set the Paint Bucket's blend mode to Behind and click on the transparent area. To erase areas of an image (based on the color clicked upon), set the Paint Bucket's blend mode to Clear and click in the desired color.
19) The Gradient Tool
- When using the Gradient tool, check "Dither" on in the Options bar to minimize banding over long gradients.
![]()
- The Gradient tool has multiple styles to choose from (Linear, Radial, Angle, Reflected, and Diamond). '[' or ']' will move you quickly from one to the next gradient style.
- ',' (comma) or '.' (period) goes to previous or next gradient swatch in the Gradient Preset Picker. Shift + ',' (comma) or '.' (period) goes to first or last gradient swatch in the Gradient Preset Picker.
- Double clicking on a gradient stop in the Gradient Editor will bring up the color picker. Option -drag (Mac) | Alt -drag (Win) on a gradient stop to duplicate it.
20) Paint Symmetry in Photoshop
- In this episode of 3, 2, 1, Photoshop! Paint Symmetry, Julieanne demonstrates how to unlock the Radial Paint Symmetry's hidden features in Photoshop. https://youtu.be/IP2LIPZVc94
And links to some additional videos:
The Oil Paint Filter in Photoshop CC – In this video, Julieanne demonstrates how to apply a painterly look to an image using the completely re-coded Oil Paint filter.
The Secret to Photoshop's Art History Brush – In this video, Julieanne demonstrates the power of the Art History brush and its ability to continuously sample from any history state or snapshot.
Airbrush (1), Art History (1), Blend Mode (1), Brush Options (1), Brush presets (1), Brush Size (1), Brushes and Painting (15), Color Dynamics (1), Custom Brush (1), Custom Cursor (1), Dotted Lines (1), Eraser Tool (1), Flow (2), gradients (3), Mixer Brush (1), Oil Paint (1), Opacity (3), Paint Bucket (1), Paint Symmetry (4), Straight Lines (1)
Copyright © 2021 Julieanne Kost.
All rights reserved.
Change Brush Size Photoshop Shortcut
Source: https://jkost.com/blog/2017/05/brushes-and-painting-tool-shortcuts-in-photoshop-cc.html
Posted by: madrugahoner1988.blogspot.com
0 Response to "Change Brush Size Photoshop Shortcut"
Post a Comment